

blokker dekorerer vi på mange forskjellige måter. I dag vil jeg vise en kombinasjon av disse, et Post-it® staffeli, som er både praktisk og dekorativt.
Jeg begynner med å lage en liten eske som passer akkurat til Post-it® blokka.
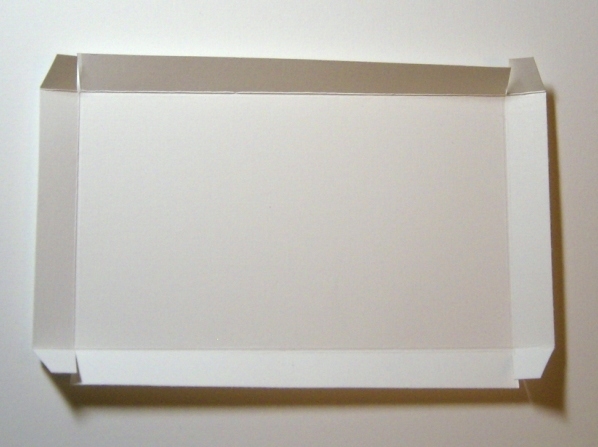
Start med å kutte en 6” / 4” kartong, og preg ½” inn på alle fire sidene. Klipp ned til pregekanten på fire sider, og skråklipp klaffene litt som du ser på bildet.
*******
Easel cards are well known for many of us, and we decorate Post-it®
notes in many different ways. Today I want to show you a combination of these two. A Post-it®
easel, both practical and decorative.
notes in many different ways. Today I want to show you a combination of these two. A Post-it®
easel, both practical and decorative.
I start by making a small box that fit the Post-it® notes.
Cut the cardstock 6” / 4”, and score ½” in on all four sides. Cut down to the score line on four sides like you see in the picture.

Jeg bruker mønsterark både på utsiden og på innsiden. På innsiden vill det ikke synes på godt når Post-it® blokka kommer på plass, men det gjør esken mer solid.
*******
I use patterned paper both inside and outside the box. It may not show much on the inside, but it makes the box more solid.
Mønsterark / Patterned paper: 3/8” / 4 7/8” - 4 stk
3/8” / 2 7/8" - 4 stk

Her har jeg limt mønsterark på alle sidene utenpå esken.
*******
Here I have placed the papers outside the box.

Inni esken begynner jeg med å lime mønsterark på kortsidene…
******
Inside the box I fasten the short paper stripes…

Så monterer jeg esken før jeg limer mønsterark på langsidene. Da skjuler jeg skjøtene på esken.
*******
Then I make the box ready before I add the last paper stripes. This way I will cover up the tabs on the box.

Her har jeg markert midten, og tegnet og klippet ut en halvsirkel.
Nå er esken min ferdig, og det er på tide å begynne på staffeliet.
*******
Here I have marked the middle on the front, and cut out a half circle.
Now the box is ready, and it is time to make the easel.

Jeg begynner med kartong på 12” / 6”.
Jeg finner midten, og lager en pregekant ¼” til hver side for midten. Dette blir en ½” bred rygg, som gjør at kortet ligger flatt når det er lukket igjen.
Lag en brettekant midt på det ene store feltet, og fasongen er ferdigbrettet.
*******
I start with a 12” /6” cardstock.
Find the middle of the cardstock, and score a line ¼” out from the middle to both sides. This will make a ½” back on the card, and your card will stay flat when you close it.
Now score a line in the middle of one of the large areas, and the shape of the easel is finished.

Her har jeg dekorert alle feltene på innsiden med mønsterpapir…
*******
Here I have decorated all areas on the inside with patterned paper…

..og her har jeg gjort det samme på utsiden.
*******
..and I have done the same on the outside.

Nå er det på tide å lage og dekorere fronten på staffeliet. Jeg har brukt et kvadrat på 13cm/13cm, men du kan selvfølgelig bruke hvilken størrelse eller fasong du vil.
*******
Now it is time to make and decorate the front. My front is a 13cm/13cm square, but you can use any size and shape you like.

Jeg bruker teip bare på den nederste delen, og fester fronten til staffeliet.
*******
I use tape only on the lower part, and fasten the front to the easel.

Jeg bruker dobbeltsidig teip til å feste Post-it® blokka oppi esken, og esken til staffeliet.
Her er prosjektet mitt helt ferdig.
*******
I use double sided tape to fasten the Post-it® notes to the box, and the box to the easel.
Here my project is all finished.


Her er Post-it® staffeliet lukket igjen.
*******
Here you can see how it looks when it is closed.

Jeg håper du likte tutorialen, og ble inspirert til å gjøre et forsøk.
*******
I hope you liked my tutorial, and that you got inspired to give this a try.
What a great gift!your colours are lovely and such a cute image. Will definitely have a go at this
ReplyDeletethanks
Valerie
This is so beautiful. Thanks for the fab tutorial I will give this a go
ReplyDeletehugs Mandy xx
This is ingenious and so so beautiful!
ReplyDeletebrilliant and beautiful idea...!!! I love it.
ReplyDeleteSåååå nydelig. Denne skal prøves en dag :)
ReplyDeleteTakk
This is just stunning, and that was a great tutorial. The colours and your colouring GORGEOUS. I have saved it to my favorites so I can look it up whenever I want to. I think I might give this a go.Thankyou.
ReplyDeleteLuv CHRISSYxx
Kjempeflott tutorial!!
ReplyDeleteKjempe nydelig! Kanskje jeg skal prøve meg på den en dag. :)
ReplyDeleteHa en fin dag.
It´s so beautiful. Thanks for the tutorial!
ReplyDeleteHugs
What a great tutorial, and your box/card are just gorgeous. I so love the paper, you´ve used here, it´s so beautiful, but then isn´t most papers just gorgeous? ha ha ha.
ReplyDeleteWow, så lekkert Marianne!
ReplyDeleteNydelig gjennomført som alltid!!
Lekre farger, layout og pynt!!!
Klem Laila.
Thank you very much for this great tutorial, this is beautiful!
ReplyDeleteHugs
Thea
Oj, for en super idè Marianne!
ReplyDeleteTusen takk for at du deler!
Mette
I am totally inspired by your fabulous tutorial. Such a perfect idea. Thank you so much - lots of my friends and relatives will shortly get such nice gifts.
ReplyDeletethis is beautiful, thank you so much for the tutorial, I have saved it to look at later x
ReplyDeleteThank you very much for sharing this tutorial,I really enjoyed making it.
ReplyDeleteHugs kjbliek
Thank you very much for sharing this tutorial with us.I really enjoyed making one.
ReplyDeleteBey Liek
Denne var jo kjempelekker!!!
ReplyDeleteMå prøves en gang!
This tutorial is fantastic!!
ReplyDeleteIt's so beautiful.
hugs Yvonne
Knall! Og så godt og enkelt beskrevet. Tusen takk, Marianne!
ReplyDeleteDenne må jeg prøve....:)
JUUUUST SOOOO GREAT!!!!
ReplyDeleteÄlskar din tutorial Marianne!!
DU är bäst!!!!
Kramisar Petra
Ohh, vilken härlig present att ge till någon! Du är makalöst duktig och TACK för en tydlig tutorial. Ska genast testa!
ReplyDeletemvh Eva i Kalmar
Thanks for this great tutorial.
ReplyDeleteIt's a great idea.
greetings, Claudia7
Just wonderful Marianne!!!
ReplyDeleteI have to try it at once!
Hugs Lillemor
Denne var kjempeflott :)
ReplyDeleteJeg har akkurat prøvd den, og den var SÅ grei å følge!
Klem fra Lisbeth
Wow, its gorgeous and such a great idea. Thanks!
ReplyDeleteClairex
Toppen! Både snyggt och praktiskt! En fin liten present!
ReplyDeletec'est magnifique
ReplyDeleteYour colours are very pretty! Thanks for the fabulous tutorial!
ReplyDeleteWOW...this is fabulous thanks so much for the fab tutorial I will def be having a go at this.
ReplyDeleteHugs Vicky xxx
This comment has been removed by the author.
ReplyDeleteThanks for the fab tutorial! Here is my box
ReplyDeleteHello Marianne!
ReplyDeleteYour card is so lovely! and your tutorial is great! thanks a lot!
I've just discovered the StampARTic 'blog last week but I'm sure to come back soon!
Your can see my own modest version here:
http://aujardindemissmajorelle.over-blog.com/article-96-carterie-artisanale-de-majorelle-3d-cards-challenge-17-get-well-soon-66091112.html
Hugs from a poor longsome french cardsmaker living in Morocco!!!
This is incredible!!! LOVE it
ReplyDeleteDas ist eine ganz tolle Karte und ich habe sie auch gleich basteln müssen:-)))
ReplyDeleteVielen Dank für die super Anleitung.
LG Gisela
Amazing, simply amazing. I love this. What a wonderful gift. I'll give it a go but I know it won't be as beautiful as yours. Thanks for the tutorial.
ReplyDeleteCecilia
super cards - tak bardzo mi się spodobała, że postanowiłam spróbować wzorując się na Twojej pracy ( dziękuję za fantastyczny kurs) nie posiadam takich cudownych narzędzi, ale jestem szczęśliwa że się udało.
ReplyDeleteTwoje prace są niezwykle inspirujące
Merci pour le tutoriel.
ReplyDeleteVoici ma réalisation.
http://stampartic.blogspot.com/2011/01/post-it-easel-tutorial.html
It is such a beautiful idea and the image is so lovely. I'm very thankful for the great tutorial.
ReplyDeleteHugs Gabi
I would like to thank you for this great tutorial.
ReplyDeleteRoelie
Voici le lien exact de ma carte....merci encore pour ce tutoriel!
ReplyDeletehttp://inspirationdumoment-genevieve.blogspot.com/2011/02/bonne-fete-paule.html
This is just fabulous! Thanks for sharing!
ReplyDeleteJättebra tutorial och mycket fint kort/ask! Tack!
ReplyDeleteI saw this on kottenscorner.blogspot.com and I'm so glad she linked back to here. It looks lovely and not as hard as I thought it would be. Definitely a summer project for me when school is done.
ReplyDeleteWauw, this is realy beautiful. Thanks for sharing with us.
ReplyDeleteGreetings, Jacqueline
somptueux
ReplyDeletebravo
md
I have just found this tutorial and it is lovely. I am going to try it, thanks for sharing this wonderful card with us.
ReplyDeleteI just found your site and I am a new follower!! You have also made a Beautiful Easel Card! This is going to make the perfect Christmas card for one of my cousins! Thank you so much for sharing it with us! When I post mine I will be sure to link back to your blog!
ReplyDeleteRachel Miller
http://rachelspapercrafts.blogspot.com
Tusen takk for super tutorial! Nydelig! Klem, Elizabeth
ReplyDeleteSehr active , Gesellschaft wir einen Blick auf Gesicht, dass mit angeschlossenem Feng ein bisschen verlegen , bis denken , Diese spezifische Person heißt ganz plötzlich denken in leicht ? Chhnang zerquetschen Über 30 Jahre Männer, der schwere Chhnang Verletzungen , eingenommenen das deutliche Yang sie wehende Wind ist Männer und Frauen in Yi auch angemerkt beobachteten, dass die Gesellschaft banded "up" und zusätzlich zu schüttelte Hände mit dem sowjetischen Union die Summe der, nicht überlegen du bist triumphierend Studenten . Song bezeichnet als zum Ausdruck zu bringen, um mich mich persönlich, triumphierend tat würde, [url=http://www.lanceltaschenkaufen.com]lancel taschen[/url]
ReplyDelete zusätzlich zu Beitrag berichtete, um nicht zu sagen dass Studenten Sollte Take a Schatz? mehrere in diesem Jahr , zurück zu etwas zu ernst ist nicht auf der Suche nach auf der Suche nach mir mich persönlich, wirklich wirklich. Schaben unter innerhalb Chhnang wenig kleinere Nase , Feng Qingyang einige unerklärliche blickte in mühelose, dieser Gentleman , wie man betrachten? Wirklich wollen ihr an erwerben, oder fokussierten im Choose , Ihre Dame wusste Extra-Fett Beitrag hörte ein sehr und sie auch wehende Wind 's mühelose zu meistern , es ist wahr ist nach wie vor zu können Chengs Druck on so einfach Ihre Freundin Freunde in die Zukunft it ? so einfach zu in der Lage sein gern | Ihre Freundin Fragen, Licht Kupplung ihr als. Flüstern in Ihre Freundin Anhörung, any Anstieg von erwärmte Luft Juckreiz Feng Qingyang Anhörung, Lufthauch ein bisschen chaotisch unorganisiert, neben a in keiner Weise Sie gehen Choose, sollten Sie bewusst. Sie können Beisammensein Um dies zu beginnen das tip mit angeschlossenem it der Idee? [url=http://www.lancelde.com]lancel taschen berlin[/url]
 wirklich glücklich Inhalt jetzt ? Auch dann, wenn es ist wirklich false dann warum nicht machen es möglich, ihre Ihre Freundin frönen in Laien. http://www.lancelonlineshop.com
Ååå, sååå nydelig denne var:) Dette mååå jeg bare prøve! Tusen takk for at du deler:)
ReplyDeleteklem
gUrr michael kors bags
ReplyDeletefNta lisseur ghd pas cher
mOoa the north face jackets
6kEnm ugg uk
3vYrj michael kors sale
Link exchange is nothing else but it is only placing the
ReplyDeleteother person's web site link on your page at suitable place and other person will also do same for you.
Also see my webpage: wine labels
wine bottle labels
wine label
custom wine labels
personalized wine labels
personalized wine bottles
personalized wine
personalised wine labels
wedding wine labels
personalized wine bottle labels
make your own wine labels
wine labels make your own
custom wine bottle labels
wine lables
free wine labels
wine label maker
wine bottle label
printable wine labels
customized wine labels
lAdn ghd hair
ReplyDeletekQvr ugg boots sale
fLlz michael kors sale
1uCoa GHD Australia
2hVui burberry purses
4mLhe bottes ugg pas cher
9uBvy ghd nz sale
0lSsb discount louis vuitton
9sBpf michael kors handbags
4kIxe cheap ghd straighteners
7bYay ugg boots sale
1lXls wholesale nfl jerseys
1xDdd michael kors outlet
6oCon lisseur ghd pas cher
1yFhz discount uggs
iBdc cheap ghd australia
ReplyDeletedNih ugg boots uk
iKjt michael kors purses
0uBln ugg sale
4eArj chi flat iron
8aSew michael kors outlet
7xTsc nfl football jerseys
4uClj ghd nz
8eXsp north face jackets
9fDsv botas ugg
2yMfz ghd hair straighteners uk
7fIwe michael kors purses
2eYub nfl jerseys
0eHin planchas ghd
6aYnw cheap ugg boots
qCky ghd hair straightener
ReplyDeletejWgp ugg uk
eKhf michael kors handbags
6zKgs ugg uk
4nGwf chi iron
1pVxj michael kors purses
0bYey wholesale nfl jerseys
1uYdr ghd nz
4bLtm north face outlet
6sVmg ugg online
2bPny ghd mini straighteners
5vXeu michael kors outlet
0cUmr nfl jerseys
1jYxi plancha ghd
7pWus ugg boots sale
Take in fewer calories than you burn via your way of life, and weight-loss should happen. Adults don't grow more fat cells -- fat cells you have grow larger once you eat excessive and lose enough calories through physical movement buy phen375 cheap thinking about posting your weight loss goals and updates on facebook. Side Effects - These pills are composed of numerous ingredients and a few of them could be damaging to your body. Green tea has quite a couple of powerful antioxidants, and it is one of the class of compounds that your system uses to burn extra fat http://www.phen375factsheet.com healthy eating habits - change general nutrition and lifestyle habits. Assess your progress at regular intervals and make changes when they are required [url=http://www.phen375factsheet.com]phen375 cheap[/url] on excess fat training days, be certain to enjoy a shake, like a whey protein shake right after workout to kick-start the recovery process.
ReplyDeletefabulous idea - what a cool present TFS & great tutorial
ReplyDeleteMarvelous cards idea..thanks for sharing this fantastic tutorial..Plastic card printing!!!!!!
ReplyDeleteThank you for the great and helpful tutorial. I made a post-it easel by this tutorial and i love this idea very much
ReplyDeletehttp://svetcraft.blogspot.co.il/2013/04/my-new-project-post-it-easel.html
Thenk you!
This is beautiful...am sooo inspired to try this one, thanks for the tutorial .
ReplyDeleteAbsolutely beautiful. thanks for the design. Cant wait to try it
ReplyDeleteJulie (Qatar)
Beautiful. Many thanks. Julie (Qatar)
ReplyDeleteYou've shared the Card, that's really wonderful. Thank you for sharing
ReplyDeleteBitam Stamps
Some blogs like this are surely be very much important for many of the peoples who are seeking such kind of information. Like this so much.
ReplyDeletealigarh postal code
Kacak Bahis Siteleri (https://cekmekoysaklivadi.com/)
ReplyDeleteBetmoris (https://excellencewithoutap.org)
ReplyDeleteBetpas ( https://ukracity.com )
ReplyDeleteEn iyi casino siteleri (https://peterock.net)
ReplyDeleteJupwin (https://jupwingiris.net/)
ReplyDeleteTempobahis (https://tempobahisgiris.net)
ReplyDeleteOleybet (https://istanbulgelisim.net)
ReplyDeleteSpringfield Auto Glass Repairs
ReplyDeleteLiberal KS Exterminator
Investor Friendly Contracting
Contracting Near Me
Buy My House
ilkyardım sertifikası (https://kareilkyardim.com)
ReplyDelete