
Today I am going to show you how you make a stationary box. You can put what ever you want in this box, cards, notepads, pencils and everything. Under here you see the picture of the box we are going to make.

The first thing you got to do is choose your papers. I have used the beautiful papers from Maja Design. The good thing is they match well together as well as they have mixed patterens.

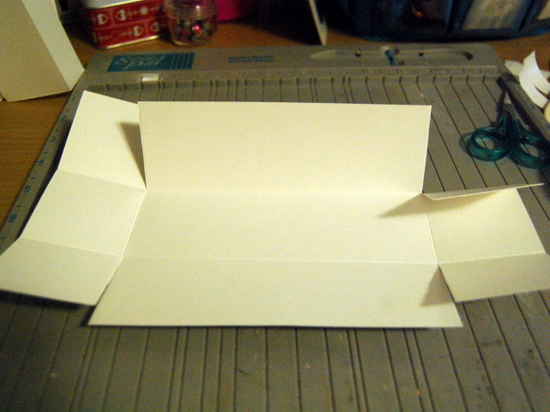
Start by scoring your paper at 5" and 7". Then turn it an score at 3" and 9" in the other direction. I scored at normal cardboard but you can also score straight on you pattern paper.

Cut on the two scoring lines like the picture is showing.

Add doublesided tape like the picture show you. Bend this one in and glue it down. This is for extra support.

This is our base.

Now we are creating the inside folders. Cut a piece of cardstock 8 ½" and 4 ¼" . Score both short sides and one of the long sides at 1 ¼”.

Trim the sides.

Add doublesided tape and glue it on like the picture show you.


Cut a piece of cardstock 5 ½" and 2" and a piece 4 ½" and 2". Score both pieces at ½” and 1” from each end. Add doublesided tape to outer pieces and attach them to your box like the picture shows you.


Now we are making the lid. I did cardboard in the lid to. I prefer to decorate the lid with pattern paper later. Cut the paper at 10 1/8” and 6 1/8”. Score at 2” on all sides. Fold ends up to form lid. (The pictures will show you what to do).


Here you can see the paper I choose for my box. The Maja Design papers makes it easy to mix and match together on your cards or projects.

Inside I decorated with a small rosett on the side. On the right side I placed a little notebook that I decorated in the same pattern paper.

Here is my finished box again. I added a big rosett on the outside to. Under the rosett I placed some Tim Holtz Photo-tape/roll. Not sure of the right name on english.

This is my finished inside. I made 4 big cards, 4 small cards and 4 tags.

Here you can see all the cards out for the box. The little pocket under the sentiment is for stamps ;-)

Hope you like the tutorial and if you make a box yourself remember to send it in to our Readers Gallery.
Have a great weekend ;-) Hugs from Henrikke
What a great idea to make this boxnice for a gift thanks for the tutorial
ReplyDeleteHugs harma
This is a great gift idea - thanks much for the tutorial. Did you make a box for the stamps? How does it open?
ReplyDeleteThanks for this great tutorial.
ReplyDeleteHugs Sinikka
Oh thanks for the tutoral. I have been looking for it.
ReplyDeleteKathleen x
wow,thats a fantastic make.janex
ReplyDeleteWow this is great!!!!
ReplyDeleteThis is superb! xx
ReplyDeleteIt's just lovely, and I must try to make one! Thanks for the excellent tutorial!
ReplyDeleteHugs Eva
It looks great! I`m gonna give it a try! :)
ReplyDeleteKanonflott tutorial Henrikke...kom litt for seint da, jeg har allerede rotet meg frem til en egen mal, hihi....og brukt de samme papirene!!!!
ReplyDeleteKlem, Marianne:)
Thank you SO much for the TUT. I´m sure I will try to make this wonderful gift;-)
ReplyDeleteGreat tutorial and very clear thank you!! You made a beautiful project out of it!
ReplyDeleteWow what a great tutorial. I think this has pretty much sorted out Christmas for 2012. And plenty of time to get them all done too. Brilliant!
ReplyDeleteTusen takk for en super tutorial. Jeg har lenge hatt lyst til å prøve å lage en, men har ikke vist hvordan jeg skulle gjøre det. Nå er dette ingen unnskylding lenger ;)
ReplyDeleteJättebra tutorial!
ReplyDeleteKjempefin tutorial:) Herlig gave til de som har alt:)
ReplyDeleteOh I can't wait to try this! TFS this really great project.
ReplyDeleteHelen -- Firenze Cards
I LOVE the stationary box you created. Thank you so much for the tutorial.
ReplyDeleteThe Tim Holtz item is called "film strip" in America.
What measurements should we use for the little pocket (box) that holds the stamped image or sayings?
Victoria Merrick from Ocala, Florida, USA
Merci pour ce super tuto.
ReplyDeleteHi
ReplyDeleteSuperbe !
Merci beaucoup pour ce tuto très bien expliqué. 😍😍
I love this
ReplyDeleteThank you for sharing. What are the measurements for the first sheet of paper you used for the box?
what size paper do you start with for stationary box
ReplyDeletewhat measurment is the cardboard to start with. also the measurment for the little pocket. thankyou PAM
ReplyDeleteI just came across this tutorial on P interest, I love it, I needed something to gift my hand made cards to someone, and this will be fun for her to receive. Thank you for sharing.
ReplyDeleteSo confusing! You missed a few step details. In the end photo did not match the photo of cut and scored cardstock.
ReplyDeleteGrateful for the insightful blog. In search of an assignment? Look no further. Our premium law assignment help, supported by a team of dedicated experts available 24/7, is here to elevate your academic success. Reach out anytime for assistance with assignment-related questions.
ReplyDelete