Suomenkielinen opas löytyy täältä
**********************************************************
Hvem har vel ikke lyst til å få vist frem bilder av kortene sine eller andre prosjekter på bloggen, vakrest mulig?
Etter at vi fikk Camilla inn på DTet fikk hun raskt spørsmålet fra oss andre om dette, for Camilla har alltid presentert kortene sine så vakkert!
Etter en kort forklaring fra Camilla var bl.a jeg blitt hektet på photobucket, og riktig fotografering, og vi tenkte kanskje dere hadde lyst til å få noen gode fotograferingstips!
Vi begynner med fotograferingen;
*Innstilling på kameraet – Jeg bruker alltid makro innstillingen, men du må finne hva som passer deg og ditt kamera best.
*Setting – Du trenger dagslys. Lampelys gir gule bilder og feil farger, så ha tålmodighet og vent på dagslys… alternativt er dagslyslamper, men dette har vi enda ikke fått testet ut.
Jeg finner en plass der jeg får masse dagslys inn på kortet, og legger hvit kartong/bazill under kortet og setter en hvit kartong opp bak kortet.
*Redigering på pc- etter at jeg har lastet opp bildene til pc`en redigerer jeg størrelsen og cropper bildet i et bilderedigeringsprogram. Bruk det du har, de fleste har som regel ett eller annet på pc`en. Hvis ikke kan du gjøre dette også i Photobucket., men det tar litt lenger tid å laste opp store bilder.
Resten av redigeringen skjer i photobucket.com
Finn bildet av kortet ditt i albumet etter at du har lastet det opp og klikk på edit.
Og du har da fått opp denne verktøy linjen:

Klikk på contrast og dra litt i spakene på contrast og brightness, for å få bildet passe lyst og skarpt.

Klikk på adjust og her drar du bare litt i saturation spaken…. Ikke for mye da blir fargen helt forandret.

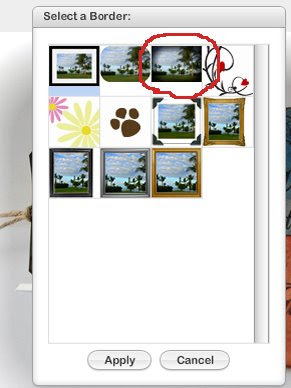
Gå til Decorate og klikk på borders

Velg vignette/matte

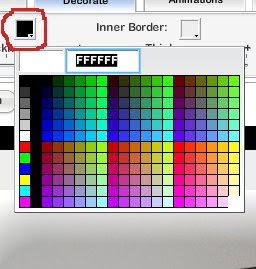
Og velg farge på rammen du vil ha, jeg bruker som oftest hvit…


Styr med knappene/spakene hvor sterk og stor ramme du vil ha og klikk på apply når du er fornøyd.

For å legge til tekst så klikk på T

Skriv inn navnet ditt eller den teksten du vil ha, og du får opp en meny automatisk, her klikker du på transparency for gjennomsiktig bakgrunn, velg skrift, farge og størrelse på teksten. Klikk og dra i tekstruten for å plassere teksten der du vil ha den.
Lek gjerne mer rundt i photobucket, det er mye morsomt en kan gjøre med bildene sine der!
Når du er ferdig med all redigering du ønsker å gjøre velg save as a copy eller replace original, og du har et bilde av kortet ditt klar for bloggen din. Last ned til pc`en din eller publiser direkte fra photobucket!
Håper du fant dette interessant og nyttig!
Husk, du kan fortsatt delta i vår 2. utfordring og ha sjangsen til å vinne nydelige papir fra 3ndypapir.no
**********************************************************
Photo tips and editing
Who doesn`t want to feature the card or project in the nicest way on their blog? It didn`t take long before Camilla got the question on how she does it, after joining our team, because she has always featured her cards so beautifully. And after a short explanation from her, I for one was hooked on photobucket and great pictures. We thought maybe you would like some tips on this subject too, and here is a step by step tutorial:
Lets start with taking the picture:
*The camera: I always use macro setting when I take my pictures, but you need to find what suites you and your camera the best. You need daylight. Lamplight give yellow pictures and odd colors, so be patient and wait for the daylight to come. As an alternative you could use daylight lamps, but we have not tested that yet.
*The setting; Find a spot with lots of and good daylight for the card. Put white cardboard / Bazzill under the card and also behind the card
*Editing on you computer: Re-size and crop in whatever picture editing program you`ve got. If you don`t have any you can di this in photobucket too, but it takes longer to upload big pictures.
The rest of the editing is happening in Photobucket Find the picture of your card afte uploading it, in your album, and click on edit. You`ll get this menu:

Click on contrast and adjust lightning and contrast to make the picture clearer and brighter.
 Click on the adjust button, and pull the saturation button to the right, but not to much, or it will make an odd color.
Go to the decorate tab, and click on Borders
 Click on Vignette/Matte
Pick the color on your frame/border. I usually go with white...


Set the size and the strength on your frame/border, and click apply when you are done.

To add text, click on T

Write you name or the text you want in the picture, and there is also a little pop up menu that comes automatically. In the pop up menu you click on transparency for transparent background for your text. You can choose between different fonts, size and colors of your writing her too. When you are happy with your text you can re-size by clicking and dragging the frame around the text, and pull the text to place it where you want it in the picture. Take your time, and play around in photobucket, it`s a fun toy, and you can do lots of fun stuff with your pictures there. When you are all done, click on save as a copy or replace original, and you r card is ready to be published on your blog. Download the picture to your computer, or publish it directly from photobucket.com
We hope you found this interesting and useful!
Remember you can still participate in our 2.challenge, and have a chance at winning beautiful papers from 3ndypapir.no

6 comments:
Camilla thank you SO VERY much for this tutorial! I am definitely going to give this a try when I get home! :0)
Hugs~ Kim
Tack för jättebra tips! Nu kanske man kan få ordning på sina bilder (eller också inte... ;)
Tack för en jättebra artikel, precis vad jag behövde :)
Så flott! Hadde nesten glemt disse rammene i Photobucket, redigerer både lys og fargemetning der, så nå skal det lages rammer også! Takk for tips! :o)
Callelle kiitos suomen kielisistä ohjeista :))
Thanks so much for sharing this technique with us.Next time i try this way and hopefully my pictures will look better on my blog. I was wondering for some time now how you did it and tried some things bur that didn't work.Thanks! :))
Rosalien
Post a Comment