

Det finnes så mange puncher og dies, og det finnes også uendelige måter å bruke og kombinere disse. Min tutorial i dag er et 3D rammekort, hvor jeg har brukt mange puncher og dies. Du kan selvfølgelig bruke tutorialen trinn for trinn, men jeg håper også du får inspirasjon til å lage dine egne varianter. Her er det bare fantasien som setter grenser.
*******
There are so many punches and dies, and so many different ways to use and combinate them. My tutorial today is a 3D frame card, where I have used a lot of punches and dies. You can of course use the tutorial step by step, but I also hope to give you inspiration to play and find your own variants.
Her er et bilde av hva jeg har brukt til kortet mitt. Du ternger slett ikke ha det samme utstyret. Poenget er å leke med det du har.
*******
Here you can see the tools I have used for my card. But of course you don`t need the exsact same things. The point is to play with what you have.

Jeg begynner med å kutte til to kartonger.
Den store er 5” / 6 3/4”, og passer til en ”around the page” punch.
Den andre kartongen kutter du litt mindre, alt ettersom hvilken bordpunch du har brukt.
Til å lage rammene har jeg brukt spellbinder dies i to forskjellige størrelser.
*******
I start with two pices of cardstock.
The big one is 5” / 6 3/4”, and fits an “around the page” punch.
The second cardstock is a little bit smaller, depending on wich border punch you have used.
To make the frames I have used two different sized Spellbinders.

Nå snur jeg den lille kartongen, og tegner en ramme rundt hullet.
*******
Now I turn the small cardstock, and draw a rectangle around the frame.

Jeg bruker bone folderen, og preger langs strekene.
*******
I use my bone folder to score the lines.

Snu kartongen, og se at du har fått en ekstra ramme.
*******
Turn the cardstock again, and you can see your scored frame.

Nå finner jeg mønsterpapiret jeg vil bruke, og kutter den til så den passer til den minste rammen.
Jeg sparer på den biten jeg har skjært bort, den vil også komme til nytte.
*******
I take the patterned paper I want to use, and cut it to fit the small frame.
Spare the left over, you will need it later.

Brett et dobbelt kort i den størrelsen du ønsker. Mitt brettede kort er litt mindre enn den store rammen.
Papirbiten jeg sparte på limer jeg midt på kortet, og mønsterpapiret jeg kuttet til har jeg her limt på den lille rammen.
*******
Now fold a card in the size you like. My folded card is just a little bit smaller than the big frame.
My left over paper I now fasten in the center of the card, and I also decorate the small frame with patterned paper.

Nå er det på tide å ta frem lim putene. Begge rammene har her fått 3D puter på baksiden.
*******
It is time to use some 3D pads.
Here both my frames have got 3D pads on the back.

Her har jeg montert rammene til kortet.
Jeg starter med den minste rammen, og limer den store rammen på til slutt.
*******
Here you can see how I have mounted the card.
I start with the small frame, and attach the big frame on top.

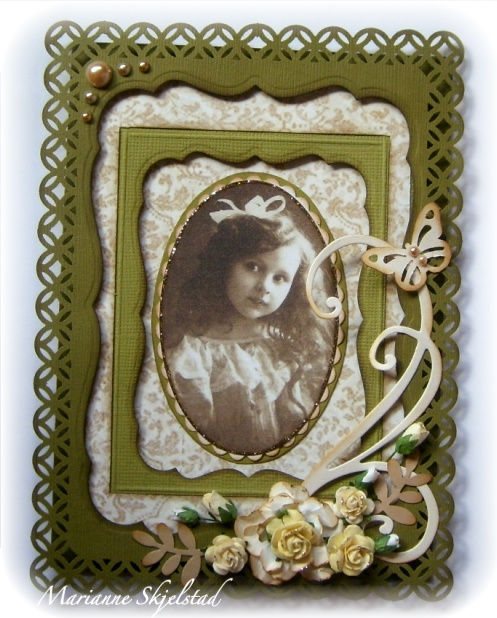
Her er kortet mitt ferdig. Jeg har brukt en oval Spellbinder til vintagebildet, og montert det på to Spellbinder rammer.
I tillegg til roser og noen perler har jeg dekorert kortet med en blomst laget av tre lag Spellbinder blomster, en sommerfugl fra Martha Stewart, swirle fra Magnolia og blader fra EK Success.
*******
My card is all done. I have used an oval Spellbinder for my vintage picture, and mounted it to two more Spellbinder ovals.
Beside roses and some pearls, I have decorated my card with a flower made by three Spellbinder dies, a butterfly from Martha Stewart, a swirl from Magnolia, and leaves from EK Success.

Her er et kort til, som er bygget opp på nøyaktig samme måte.
Se så forskjellige de blir.
*******
Here is another card built the exact same way.
See how different it looks.


Jeg håper du ble inspirert til å leke med puncher og dies.
Ha det gøy, og lykke til med ditt nye kort.
******
I hope you got inspired to play with punches and dies.
Have fun, and good luck with your card.
18 comments:
Fantastic tutorial. I will definitely be trying this soon. Thanks xx
I love this! I soooo appreciate you sharing your wonderful techniques! tfs!
Oh this is beautiful. Thank you for the step by step instruction. I have so many punches that I never think to use!
Super tutorial - kjempefine kort! :)
Ha en fin dag! Klem, Hege
WAUW a really awesome tutorial again. Your cards are just amazing and really really beautiful. Thanks sooo much for all the awesome ideas, you´re always sharing with us, I just love your work, and has been inspired of it more times to try new things out, and thanks sooo much for that.
Have a great day everyone.
Such an interesting Tutorial, Thank you. Judy x
thamls for an ispirational tutorial an such lovely samples of art
wow.. sooo beautiful.. ♥♥♥
thank you for the tutorial..
Hugs, Katrin
This is fantastic! Thank you very much for the tutorial.
Hugs
Thea
Wow such a wonderful cards made with those frames.
xx Anita
o lala ja
hva du får til:)
takk for hyggelig scrappekveld i går
klem
Wow!! What a fantastic idea and tutorial!! I am going to try this technique soon...Thanks soooo much for sharing!
Love this , I'm certainly going to try this!! Thanks for the tutorial!!
hugs, Elly
Fantastic tutorial. I will definitely be trying this soon.
groetjes marian
Precioso tutorial y muy bien explicado, gracias por esta clase.
Besitos.
what beautiful things you have made.
marlene
Så flott tutorial. Tusen takk, en ny verden av muligheter åpner seg:)
genial! thanks
Post a Comment