

I dag vil jeg vise hvordan du kan lage en åpen te eske. Denne tar seg godt ut på frokostbordet, eller er en perfekt liten gave. Om du ikke er en te drikker, så gjør det ingenting. Jeg har laget målene på denne esken til å passe små kaffeposer med cappuccino ol. også. Og liker du ikke kaffe heller, så fyll esken med sjokolade, eller hva du måtte ønske:)
Størrelsen på esken er lett å tilpasse det du vil. Lag grunnflaten til esken i den størrelsen du vil, og følg den samme fremgangsmåten.
Du får noen eksempler helt til slutt.
*******
Today I want to show you how to make an open tea box. It will look great on your breakfast table, or it is a perfect little gift. Not much of a tea drinker? Don`t worry, I have made the size of this box to also fit the small coffee bags of cappuccino etc. Not too fond of coffee either? Fill the box with chocolate or whatever you like:)
The size of this box is easy to adjust. Just make the bottom of the box the size you need, and then follow the steps of my tutorial.
I will give you some examples in the end.
______________________
Start med kartong 14cm / 22,5cm.
Preg 4cm inn fra alle sider, og klipp inn hakk som du ser på bildet.
Jeg har sotet alle kanter på både innsiden og utsiden med Distress Ink – Vintage Photo.
*******
Start with 14cm / 22,5cm cardstock.
Score 4cm in from all four sides, and cut it like you see in my picture.
I have distressed all edges on both sides with Distress Ink – Vintage Photo.

Her har jeg valgt mønsterpapiret jeg vil bruke. Mitt papir er fra Pion Design – Sagan om våren.
Utvendig trenger du : 14cm / 3,5cm – 2stk
5,5cm / 3,5cm – 2stk
Innvendig trenger du: 14cm / 3,5cm – 1stk
5,5cm / 3,5cm – 2stk
14cm / 5,5cm – 1stk
*******
Now I choose my Patterned paper. I will use papers from Pion Design.
On the outside you need: 14cm / 3,5cm – 2pcs
5,5cm / 3,5cm – 2pcs
On the inside you need: 14cm / 3,5cm – 1pcs
5,5cm / 3,5cm – 2pcs
14cm / 5,5cm – 1pcs

Her er utsiden dekorert.
******
Here I have decorated the outside.

På innsiden dekorerer jeg først bunnen og de to kortsidene.
******
On the inside I start by decorating the bottom, and the small sides.

Så limer jeg esken sammen ./ Now I glue the box together.

Så limer jeg på langsiden, og skjøtene blir skjult.
*******
Now I add the long side, that will hide the edges.

Til ryggen bruker jeg en Spellbinder dies, og jeg kutter bare toppen av papiret.
Jeg klipper papiret til målene 11,5cm / 13,5cm. Da får jeg plass til et panel rundt.
Hvis du som meg liker å dekorere baksiden også, så kutter du til en maken papirbit. Høyden på denne trenger ikke være mer enn 7,5cm.
*******
For the back of the box I use a Spellbinder dies, but I only cut the top of my paper.
Cut the paper to fit these dimensions: 11,5cm / 13,5cm. Now you have room for a panel around the paper.
If you are like me and like to decorate the backside as well, then make a second paper like this. The hight of this one doesn`t have to be more than 7,5cm.

Jeg limer papiret til en kartong….
*******
Now I glue the paper on some cardstock….

…og klipper fasongen rundt for hånd med en god saks.
*******
..and cut the shape by hand with a good scissor.

Til bunnen bruker jeg ”around the page” puncher fra Martha Stewart.
Kartongen min er 6 ¾” / 3 ¼” før jeg puncher.
*******
For the bottom I use ”around the page” punches from Martha Stewart.
The cardstock is 6 ¾” / 3 ¼” before punching.

Jeg pynter ryggens forsiden før jeg limer den på esken. Her har jeg tatt dobbeltsidig teip på den nederste delen av ryggen.
*******
I decorate the back panel before I attach it to the box. Here I have added double sided tape to the lower part of the back.

Fest ryggen til esken…
*******
Attach the back to the box….

..og lim på mønsterpapir om du vil.
********
..and add patterned paper if you like.

Det var det hele. Her er det ferdige resultater.
******
That was all. Here is my tea box completely finished.


Her har jeg laget en maken eske som passer til kaffe.


*******
Here I have made a same sized box, fit for coffee.

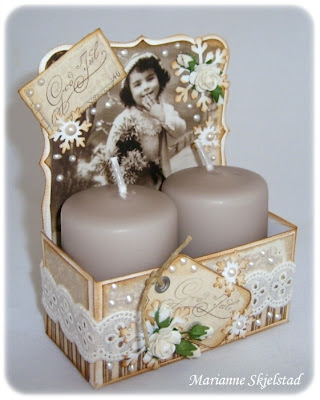
Jeg lovet noen flere eksempler.
Her er en eske som passer til to mini kubbelys.
Kartong: 16cm / 12cm
Preg 4 cm inn fra alle sider.
******
I promised you some more examples.
This box fits two mini candles.
Cardstock: 16cm / 12cm
Score 4cm in from all four sides.

Min siste eske passer til store telys.
Kartong: 14cm / 14cm.
Preg 4cm inn fra alle sider.
*******
My last box fits big taelights.
Cardstock: 14cm / 14cm
Score 4cm in from all four sides.

Jeg håper dere likte tutorialen min:)
I hope you all enjoyed my tutorial:)
60 comments:
Yes, it is wonderful. I will have to try it soon. NancyD
Oh my goodness, what a fabulous tutorial!!! These boxes are absolutely stunning, will definitely be trying to make one.
Fantastyczne, fenomenalne pudełeczka... jestem pod wrażeniem....
Great tutorial Marianne!! You are so clever!! Beautiful boxes you have made!
Hugs from Charlotte
Great tutorial, love your designs, will have to give this a go.
Hugs Cheryl
Great tutorial ! Love all the boxes you have shown. Thanks for sharing.
Ageeth xx
nyyydelig!!! Tusen takk for tutorial, denne skal prøves! :)
WOW!!! Fantastiskt tutorial och otroligt vackert dekorerat!! Du är en enorm idéspruta och inspirationskälla - tusen tack för att du delar med dig!!
Kram
Linda
Herlig :o)
Tusen, tusen takk! Skikkelig lekre, disse eskene dine - og nå er det snart jul:)
Klem Kjersti
Så fantastiskt fina ♥
Great turtorial!! I will try it soon :-)
xx Tamara
hiya sweetie
these projects are all just all gorgeous hunni
thank you so much sweetie for the tutorials
have a great day sweetie
hugs angelique
Tusen takk för de fina, vackra askar o inspiration.
Kram
Christine S
Underbara! Många tack för denna härliga tutorial! :)
Thank you very much for this great tutorial and all the lovely boxes!
Hugs
Thea
Wauw what a wonderfull tutorial, many thanks for sharing.
Greets Ingrid
Heeelt underbart fint!! Det kommer att testas!! =)
Kram Maritha
A great tutorial. Thank You!
Greetings from Germany
Margret
Nydelig tutorial!Takk for at du deler den med oss.
Torill
Åhh vilka fina askar!!! Jag älskar askar och boxar av alla de slag, måste ju testa denna, så himla användbar. Varmt tack för att du delar med dig!!
hälsar Eva
What a gorgeous boxes and a great tutorial, very easy to follow. Thank you very much.
hugs, Marlies
how gorgeous, thank you x
Extraordinaire! Wow thank you for the patern. The christmans one is my favorite
Fantastisk!! :D
Herlig inspirasjon!!
Klem!
Das ist ja wundervoll..... habe es auch mal versucht....vielen Dank für die tolle Anleitung.
LG Gisela
WONDERFUL<3<3<3
What a stunning project here, I just so love, what you´ve done, and it´s so gorgeous. I´m definately going to try this sometime soon, that´s for sure. Wonderful giftidea for a dear friend.
This is so beautiful, so thank you so much for your clear explanation.
I will make one of these boxes defenitely.
Hugs Marianne
This is absolut gorgeous. Thanks for sharing.
Hugs, Yvon
Super fin ide och vilken tutorial. Tusen tack att du delade den med oss alla.
WOOOOOOOW!!!
Jag tappade just min haka...
bäst att leta rätt på den.
Jag är mållös!
Å du är tutorialDROTTNING Marianne!!!
kram Petra
Noe så flott!! Supre gaveideer! Tusen takk for at du deler!
Den var lekker, Marianne! Den må prøves snart!
Hei,
Denne har jeg ventet på. Flott tutorial. Du er utrolig flink. Er ofte innom bloggen din for å få inspirasjon. Gleder meg til å prøve denne:)
Mvh Hilde
Noe sååå lekkert!! Dette må prøves!
Tusen takk for en flott tutorial.
Klem, Berit:)
Noe sååå lekkert!! Dette må prøves!
Tusen takk for en flott tutorial.
Klem, Berit:)
Wat een super tutorial bedankt dat je dit met ons wilde delen
Groetjes Toos
Tusen takk for flott tutorial :)
Nydelige ark du har brukt :)
It´s beautiful! Thank you for sharing this with us! We are having an online crop tonight and making this project.You´ll probably find a couple of those boze on dutch blogs after tonight :)
Så nydelige ting Marianne!!!
Tusen takk for oppskrifta!
Nå har jeg laga slike, veldig kjekke som gaver!
Wow.... stilig, og kjempefine esker!! <3
Takk for at du deler!
Oooh vilken supersöt & mångsidig ask! Tack!
WOW!! Så nyyydelig!!!!! :) :) :)
Tusen takk! Denne var helt fantastisk! Dette skal jeg prøve meg på :D
Hei =)
Jeg har akkurat laget et innlegg på bloggen min og teposekalender og tebokser. Linket til din mal der, dersom du vil se det hele må du gjerne stikke innom: http://designdrommer.blogg.no/1321621158_adventskalender__mitt.html
Hilsen Victoria
For noen helt herlige te-bokser:-D
Lovely tutorial.. :)
This is a fabulous project and great gift ideas, I `ve been looking through the rest of your blog and your work is stunning, thanks so much for sharing your wonderful projects,hugs Sara xx
magnifiques creations, merci pour le partage des tutos
Thank you so much for all the inspiration! I can't wait to try this!
Blessings,
Michelle
Oh my, so lovely and what an excellent tutorial! Thank you for sharing. You are quite talented <3 - Stormy, Branson, Missouri USA
fantastic idea's for gifts, i love your tutorial, thank you x
So beautiful!
So beautiful!
So beautiful!
love your idea! your designs are beautiful! Thank you for sharing!
Gracias por compartir. Todo es bello http://ventanasdescrapbook.blogspot.com/
Tea boxes are a great way to organize and store your tea collection. Not only do they come in many different styles and colors, but they also have a variety of benefits.
When it comes to marketing, stickers & labels are a great way to spread the word about your business. These versatile and informative tools can be placed just about anywhere, and they're sure to catch the attention of potential customers. In addition to promoting your business, stickers can also be used for a variety of other purposes, such as identifying products, labeling packaging, or even just decorating your office space.
Post a Comment