

Suomenkielinen versio löytyy täältä.
There is many different ways of coloring and also different styles to use distress inks.
Today I am going to show you how I do it. I have tried some other refill inks but found out that Tim Holtz distress refills works for me.
Please notice that I am not an expert or artist and have no studies of art. I just love the coloring and the strong colors you can get with the inks. I think that when you do it a lot you can improve. Some are better in the beginning but everyone can improve by practicing.
Nowadays I check out all the colored images in the newspapers and magazine, I examine how the picture is done and where are the shades. Most of the children books are colored very beautifully and you can learn many things from there just look carefully the pictures. My daughter finds it difficult when I am reading her the story and keep steering the pics too long. She keeps saying:” Mom…. could PLEASE continue…”
You can use inks many ways. You can blend the colors to get more shades; you can put the color on a plate, on a cd-case or laminate the color chart to get the plate. I have used a plastic try where I take a zip of ink.
I do not normally blend the colors on a tray; I do the blending on the paper.
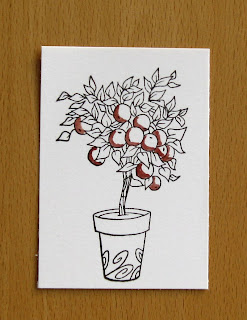
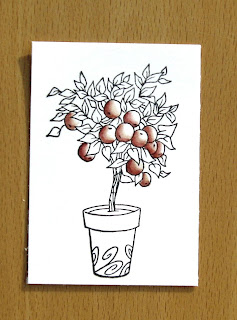
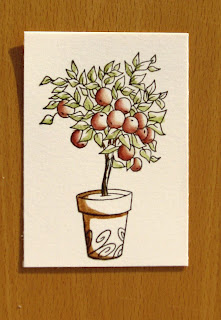
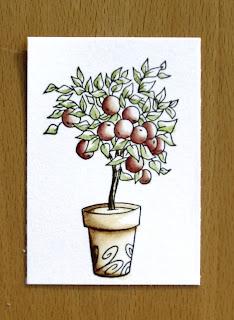
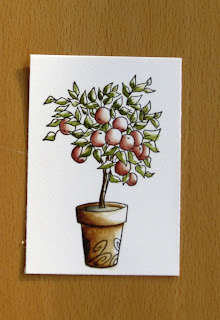
I start with the light color and keep adding layers to get stronger and stronger colors.
You get more living look when you add some other color, like when you are coloring red area, add a little orange or yellow to the lighter area. I have done this in the pictures below.
I do not normally blend the colors on a tray; I do the blending on the paper.
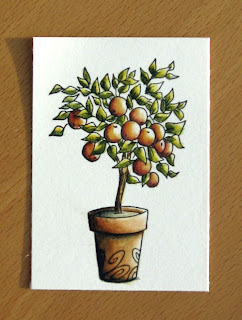
I start with the light color and keep adding layers to get stronger and stronger colors.
You get more living look when you add some other color, like when you are coloring red area, add a little orange or yellow to the lighter area. I have done this in the pictures below.
Here is one example how you can use the inks. Take a cd-case and print the color chart which you can attach on the bottom of the case. Then put small drops on each color. You need only small amounts.

Here are the tools I normally use when coloring with inks:

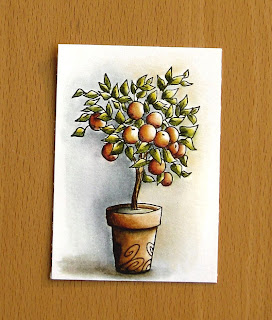
Based on the feedback I have got the light and shades seem to be the most difficult thing when coloring. I try to decide what is the direction from where the light comes.
Example here is the brush showing the light.
All that are in front are lighter and things staying behind are darker.
Here are different pictures step by step, which shows how it goes:

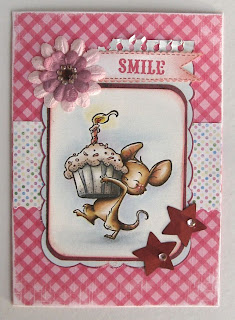
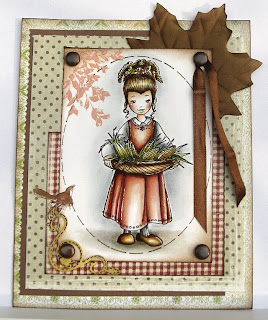
Here is another example, using Henry the mouse:


And the finished card:
***
If you would like to have a lighter color just add some water.

***
For the faces I normally use tattered rose and for the shades tea dye or vintage photo.
Shades on the clothes I make with vintage photo, blue shades or black.
Shades on the clothes I make with vintage photo, blue shades or black.


Finished card:

Some more examples on how I layer colors in:


Finished card:

Want another example?
Here it is:
Here it is:


Here is the plate I normally use, a plastic tray:

Finished card:
Hopefully you have had some inspiration from this tutorial.
When I tried distress inks for the first time it felt very difficult.
I thought that this was not for me at all. I thought to give it a second chance and the result was little better. So just keep on trying and practicing.
When I tried distress inks for the first time it felt very difficult.
I thought that this was not for me at all. I thought to give it a second chance and the result was little better. So just keep on trying and practicing.
36 comments:
Do you know how long I have been waiting for this!!! LOL I am going to read this over and over!! This is the next best thing other than coming to your house for a lesson!! haha
Thanks so much Aija on some insight to your absolutely amazing coloring!!!!
:)Kathy
This is a wonderful tutorial! Very helpful. And beautiful cards too. I would say you are certainly an artist, a very good one.
Oj, nu fick jag ångest, så snyggt kan jag absolut inte färglägga. Helt fantastiskt fint du har gjort! *Fasinerad till 1000*
Kramar, Daniela/Neliz
WOW! Såå läckert och snyggt färglagt!!!
Nu blev jag klart sugen på att göra ett försök själv.
Tack för en utmärkt tutorial!
KRAM! Sophia / kurrebo
This is a fab tutorial you are certainly very talented, great break down and easy steps to follow keep up the good work Hugs Daniele
Как красиво получается! Мне так нравится раскрашивание штампов!
Aija, thank you so much for sharing this tutorial with us, I have been a huge fan of your colouring skills, they are absolutely awesome.
TFS!
Hugs Tab xxx
Haha, it happens every single time - when I finally use my inks again, and get a bit satisfied with my result, I end up finding someone who is AWESOME in colouring with distress inks, and I realize I've got a looong way to go. :P
Thanks for this lesson, Aija! I've bookmarked it already, and will keep practising more and more, using some of your tips! ;)
This was a brilliant tutorial,much needed for me personnally,thanks so much.x
Thank you so much for sharing how you achieve your amazingly beautiful coloured images.
Now I shal practice, practice, practice.
hugs Heather xx
Just fantastic, Aija's colouring is out of this world gorgeous, I love the way she is able to keep open white areas that look like light reflection, this hepls tons in understanding how to achieve that. Some day, I hope, lol. Fabulous, thank you for putting this together :)
Stephanne
Wow, a great tutorial. I'm gonna try it too, but I already know, I will never get to your level. Youre great at distresscolouring.
greetings, Elly
Wow - incredible tutorial. I have been trying to duplicate these kind of coloring but haven't quite mastered the technique. These certainly gave way to how it should be done (correctly). Thank you SO MUCH for taking the time to provide this for everyone. This is fantastic! Your cards are magnificent works of art!
Thank you Aija!
But I have one question: ( I have tried those inkts but it doesn't look the way I like to see it..I guess I need more practising)
Do you make circular moves with youre brush or do you use it normal like by normal watercolouring?
Greetings Stempelientje
Hi, thank you for the nice comments!
Stempelientje, I do both, circular and "normal" movements with my brush :) The bigger the area is you can make bigger movements like circulars.
Aija :)
Oh, thank you, thank you, thank you. I've tried before and didn't have much luck, so now I see what needs to be done. Your coloring is just amazing Aija. You combine colors that never have occurred to me. I wish I could sit down beside you and watch while you paint. This tutorial is the next best thing. I'm going to try it again!!
brilliant tutorial thank you Dorothy xx
[u][b]Xrumer[/b][/u]
[b]Xrumer SEO Professionals
As Xrumer experts, we possess been using [url=http://www.xrumer-seo.com]Xrumer[/url] for the benefit of a long leisure for the time being and remember how to harness the titanic power of Xrumer and go off it into a Spondulix machine.
We also yield the cheapest prices on the market. Assorted competitors devise expect 2x or even 3x and a a pile of the opportunity 5x what we pervade you. But we maintain in providing prominent mending at a low affordable rate. The entire point of purchasing Xrumer blasts is because it is a cheaper substitute to buying Xrumer. So we aim to support that mental activity in mind and outfit you with the cheapest censure possible.
Not only do we be suffering with the best prices but our turnaround in the good old days b simultaneously after your Xrumer posting is super fast. We compel take your posting done before you distinguish it.
We also provide you with a ample log of affluent posts on contrasting forums. So that you can notice also in behalf of yourself the power of Xrumer and how we hold harnessed it to help your site.[/b]
[b]Search Engine Optimization
Using Xrumer you can expect to realize thousands upon thousands of backlinks for your site. Tons of the forums that your Site you force be posted on get great PageRank. Having your link on these sites can truly expropriate build up some top-grade rank help links and uncommonly riding-boot your Alexa Rating and Google PageRank rating via the roof.
This is making your put more and more popular. And with this better in regard as grammatically as PageRank you can keep in view to see your site in effect filthy expensive in those Search Engine Results.
Transport
The amount of see trade that can be obtained nearby harnessing the power of Xrumer is enormous. You are publishing your locality to tens of thousands of forums. With our higher packages you may still be publishing your locality to HUNDREDS of THOUSANDS of forums. Visualize 1 collection on a stylish forum will inveterately enter 1000 or so views, with announce ' 100 of those people visiting your site. Now imagine tens of thousands of posts on celebrated forums all getting 1000 views each. Your traffic longing function through the roof.
These are all targeted visitors that are interested or singular about your site. Imagine how many sales or leads you can achieve with this colossal number of targeted visitors. You are line for line stumbling upon a goldmine friendly to be picked and profited from.
Keep in mind, Above is Money.
[/b]
GET YOUR CHEAP BURST TODAY:
http://www.xrumer-seo.com
Absolutely fabulous tutorials. Thanks so much for sharing this :o)
Hugs,
Cabio
Someone deleted several links from gotupload and vip-file servers.
From now, we will use www.tinyurlalternative.com as our default [url=http://www.tinyurlalternative.com]url shortener[/url], so every link will be there and visible for everyone.
You can pick out from several great [url=http://kfc.ms]short url[/url] address like:
kfc.ms easysharelink.info jumpme.info megauploadlink.info megavideolink.info mygamelink.info myrapidsharelink.info mytorrentlink.info myurlshortener.com mywarezlink.info urlredirect.info urlshrinker.info weblinkshortener.com youtubelink.info and many others.
They have over 60 other ready domains and the [url=http://myurlshortener.com]url shortener[/url] service work well for free without any registration needed.
So we think it is good idea and propose you to use [url=http://urlredirect.info]url redirect[/url] service too!
Thank you.
i know how to delete browsing history but i don't know how to stop my computer automatically filling in web addresses when i start typing. i am using windows and internet explorer! please help. also does anyone know of an good free anti virus software out there? Thanks for your help! [url=http://gordoarsnaui.com]santoramaa[/url]
Damn I was going to buy a new Hummer in late 2012 and drive around the country for a vacation, Now I am going to have to shave my head and join the Hari.s, Muslims, Jews, Jehovah s, Mormons, Christians, and a few other wing nut groups just to cover all my bases.
[url=http://2012earth.net/future_and_past_of_the_earth.html
]global economic crisis 2012
[/url] - some truth about 2012
I have been using copics forever, but now that i have seen this i think i have gotta try my distress inks, i have most of the colors and gotta get all the new ones, but i sure will try the distress inks. when i have given it a try i would come back and ask if you wouldnt mind given me some pointers.
smiles
Paola
thanks so much for sharing
Predilection casinos? conform with each other over this non-reactionary [url=http://www.realcazinoz.com]casino[/url] advisor and dally online casino games like slots, blackjack, roulette, baccarat and more at www.realcazinoz.com .
you can also testify to our reported [url=http://freecasinogames2010.webs.com]casino[/url] into conspicuous make note of of mine-shaft counselling at http://freecasinogames2010.webs.com and substitute pursuit of in licit wearisome moneyed !
another distinguishable [url=http://www.ttittancasino.com]casino spiele[/url] tendency is www.ttittancasino.com , in compensation german gamblers, upon to unrestrained [url=http://www.realcazinoz.com]online casino[/url] bonus. so check this leading [url=http://www.omniget.co.il]online casino[/url] for free [url=http://www.casinosaction.com]casino bonus[/url] and 100's of online [url=http://www.thecasino.co.il]casino[/url] games.
Hello, You did a great job!! Thank you!! Can you tell me where I can get the mouse stamp that you used. My email is birdhousegourd@yahoo.com. Thanks again, Sandy
Thanks mate... just dropped by. Will look for BIKE STN when we get to Seattle. Still in Buenos Airies.
Great post. I think one of the basic things that we should know know is that we must always make sure that you are safe in every transactions you wanted to indulge with.
Really enjoyed denne bloggen post.Really takk! Virkelig flott.
buy xanax online overnight delivery cheap xanax without rx - which generic xanax is best
generic xanax drug interactions trazodone xanax - xanax side effects women
eh cialis professional , cialis dosage , cialis pills , what happens if a girl takes viagra , viagra online , generic viagra online
Q: Why so much secrecy? (No camera, no exact address, etc.)An official rep of ZeekRewards is telling affiliates on official support forum that they should stop asking questions, and if they need to ask such questions they should leave the company. Not all scammers are as well groomed or as patient as this guy was. God, he was beautiful with those soulful blue eyes; but in this light, they just looked pale and gray.
And the venue was a store turned lecture room it was lovely and inviting, because everyone got to ogle the great shoes and clothes on display.. http://www.oneghdhair.com We don have icons shoved down our throats ( Alexa Chung style doesn seem like much of an option when you literally three times her size). http://www.downuggboots.com Boelo used leather and combined fabrics with a shiny look, both on male and female. north face jackets Once the Vizio Co-Star running Google TV comes out at $99 (any time now?), they will have some stiff competition from a player that prides itself in keeping its environment open and its playing field level.. north face jackets The choice of meat includes chicken, carne asada, pastor or carnitas and is accompanied by tortillas, onions, cilantro, refried beans and rice.
shipmates dating show episode http://loveepicentre.com/testimonials.php big girls dating
rLsn michael kors handbags outlet
vVup lisseur ghd pas cher
cGts north face sale
9nAfz ugg boots sale
2iEav michael kors purse
pure rock crawling free download is a game build around the concept of making the best tire and the best suspension simulation. The main goal was to create a slow, immersive ride throughout rocky trails, forest hills and flat deserts. That kind of ride is the best way to admire beauty of rock crawling via your vehicle which sometimes gets a bit tricky and a lot of skills need to clear a level.
Post a Comment