
♥ Christmas Basket ♥
 So, today it´s me, Henrikke, who gets to fire up out "Day-of-fun"- Christmas! I´ve made you a tutorial on a christmas basket. The one we are going to make looks like this -->
But before we get started you need a couple of things:
- 1 bazzill
- 2 patteren-papers
- Scor-pale
- Cutting-board
- Punch to make small holes
- Double-sided tape
- Decorations
- Ribbon
Yes, that´s about it. So are you ready to get started than??
STEP 1: The first thing you got to do, is line up your bazzill on the scor-pale. I fyou dont have a scor-pale you can always use the cutting-board with a score-knife, but you will have some problems later in the tutorial.


Score your paper at 4 and 8 inch.

Than turn it around and score at 4 and 8 inch again.

Your card-stock should look like this now. 2 scoring-lines in each direction.

So, this is where you will have problems if you don´t have a scor-pale. Now, turn your card-stock around, like the picture above shows you.

Now you are scoring the corners of the basket, so these lines are going diagonal.

A little trick: If you are having problems with the line up of your cardstock while doing this, use your lines on the side to create a symmetri. By lining them up at the same number on both sides you can be sure your scoring-line will be straight.

This is how your cardstock should look now.

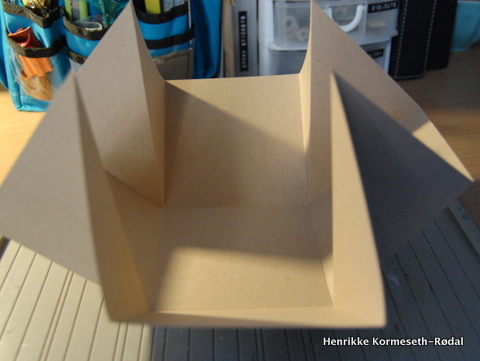
Start to fold your vertical and horizontal lines.


Now, do the diagonal like the picture shows use.

Than your basket is all folded.
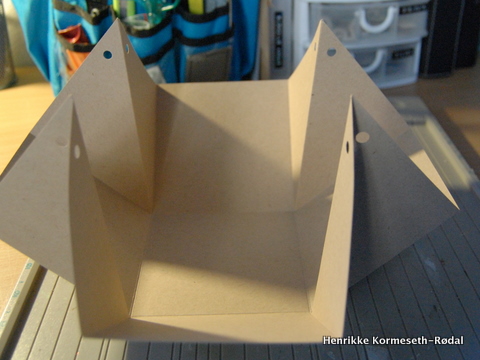
Now this is a step you can jump over if you want to. My hole-punch is not strong enough to go trough 3 pieces of cardstock. That´s way I`m making holes on each step before my patteren paper comes on. If you have a good hole-punch, you can do this at the end, and save some time.

Here you can see all of my corners got pierced.
STEP 2: Now we are moving on to step 2. Take your patteren-paper out. I use to double-sided papers. It ´s important that they match. Start by marking you patteren paper on 4 and 8 inch on each side.

Cut you paper at you markes. You will end up with 9 pieces on each paper.


You might need to cut of about 5 mm on each paper on two of the sides, if you want you cardstock to show.

Now you can see that I sorted mine out. Both of my patteren papers had a plain color on the other side. So I´ve matched them up. I divided mine so I have 5 with the plain-back color and 4 with the patteren.

Before I put them on I have inked the edges using Ranger Distress ink, color: Walnut Stain.

So now you can see how I placed them.

I placed on whole piece in the middle.

The four others I cut in half. Remember to ink the edges again on the cutting-side.

I use double-sided tape to glue them on.

Finished.

Now, I take my holes again.

And than we have to do the same on the front.

When you finihed and all of you small 4x4 inch sqaures have paper in them, we put a tread in the hole you hade. I used hamp-tread this time.

Pull it together and make a nice bow on the top.

STEP 3: Than move over to decorations. I´ve chosen to use my Spellbinders to create a frame. I have also use stamps from Stampin Up!

Here you can see that I used 3D-tape to glue my frame on.

So after some flowers and perles, my basket is ready to go! Fill it up with candy, wrap it in cellofan and give it away for christmas.


Thank you guys for keeping up with me. It´s a long tutorial, but if you have any questions at all, please ask me as a comment, and I will come back to you ;-)
♥ Big 1.december-hugs from Henrikke ♥
10 comments:
Great Tutorial, I really love your basket and would love to give it a go , tfs.
Hugs Cheryl
What a wonderful tutorial! Thanks for sharing.
i so love this basket i made mini one's for a swap and put a handmade flower in there.
thank you so much for the tutorial.
with lots of love magi
wow.. looks fantastic.. thank you for the tutorial..
Hugs, Katrin
Really wonderful tutorial:) Thanks a lot for sharing this lovely step by step tutorial
Great Tutorial Hun!!!!!
Just looooove your Christmas Basket!! <3
Many hugs Petra
Super tutorial. Thank you for sharing your beautiful creation. xx
Love your basket and thanks for the detailed tutorial.
thanks for your tutorial : my boxes are here
http://les-passions-de-fiora.over-blog.com/article-tilda-boxes-111824441.html
Nice post thanks for sharing with us. Struggling with nursing assignments? Avail of our specialized nursing assignment help services for comprehensive assistance. Our experienced writers guarantee high-quality content tailored to your academic needs.
Post a Comment